Chart patterns are visual reflections of price action — the “battle between buyers and sellers” playing out over time. When recognized and traded correctly, they give us logical entry points, clearly defined risk (stop-loss), and objective profit targets. This transforms trading from guesswork into something closer to a plan.
Without rules, chart-pattern trading becomes emotional and random. With rules, it becomes systematic — a prerequisite for long-term success.
Three Key Rules When Trading Patterns: Entry, Stop-Loss, Target
-
Entry — wait for confirmation
-
Stop-loss — always define risk before entering
-
Target (take profit) — use the pattern’s structure to set realistic goals
Let’s unpack each, with examples and a trader mindset.
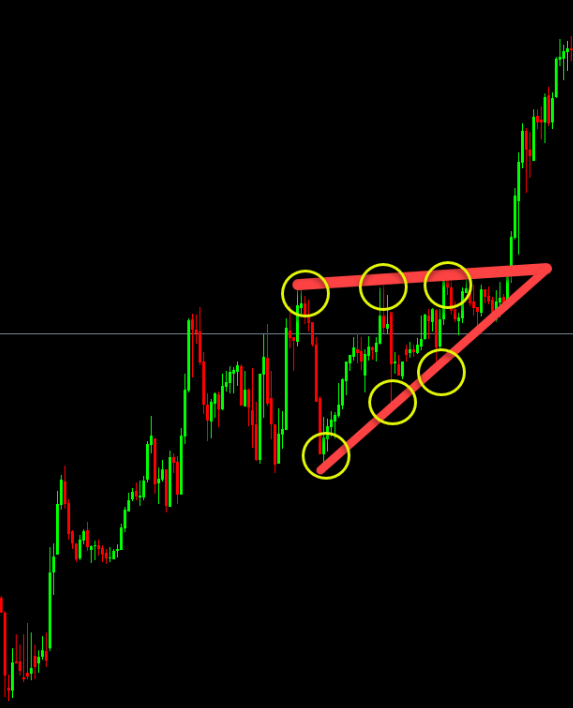
How to trade them – Let’s see an example here: Ascending Triangle Pattern
-
Look for an uptrend and draw your trendlines: mark the horizontal line (if present) + the sloping line. Ensure at least 2–3 touches on the top of the pattern, and the bottom of it
-
Monitor the compression: price range narrows, volatility drops. That’s a warning that a breakout may be coming.
-
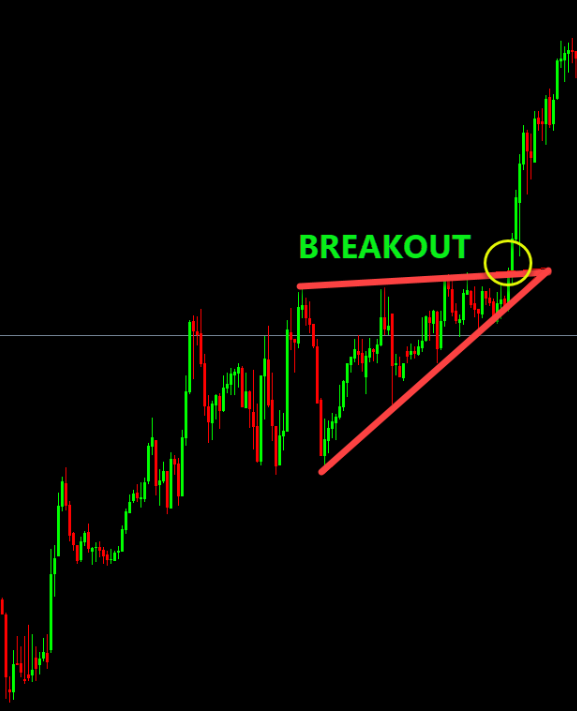
Entry: Wait for a confirmed breakout of the triangle (close beyond the horizontal trendline).
-
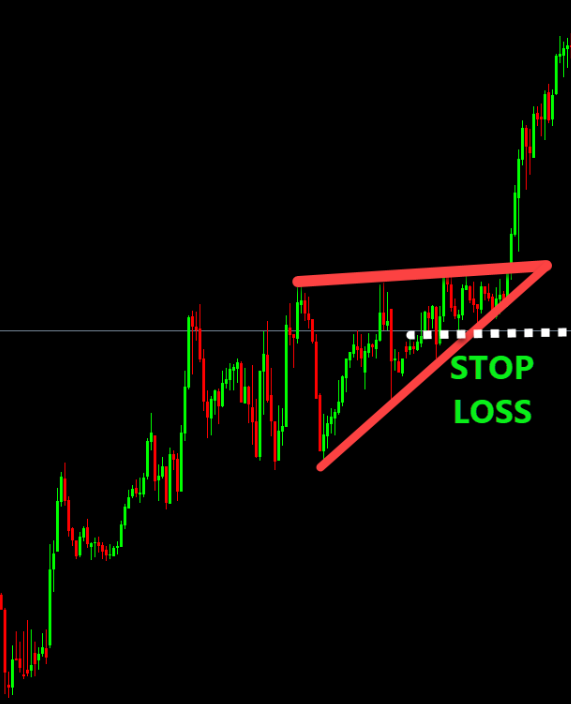
Stop Loss: Just on the opposite side of the breakout line (i.e., if breakout above resistance, stop just below the rising line and the last low): this gives a tight risk.
-
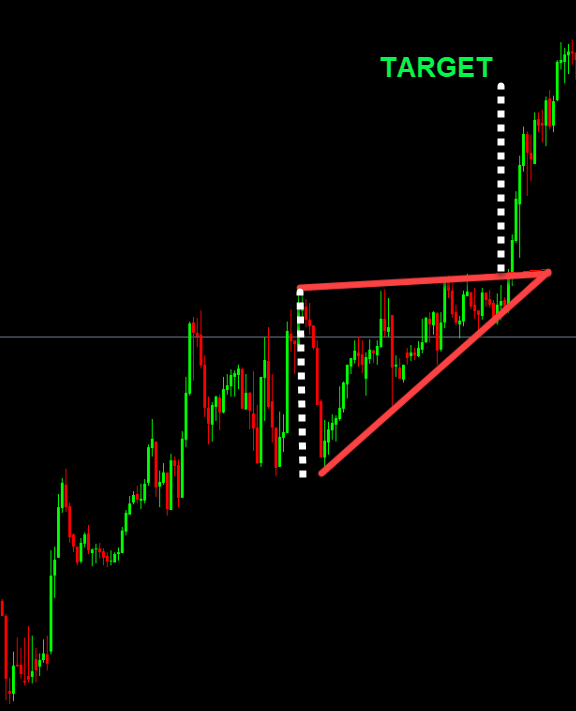
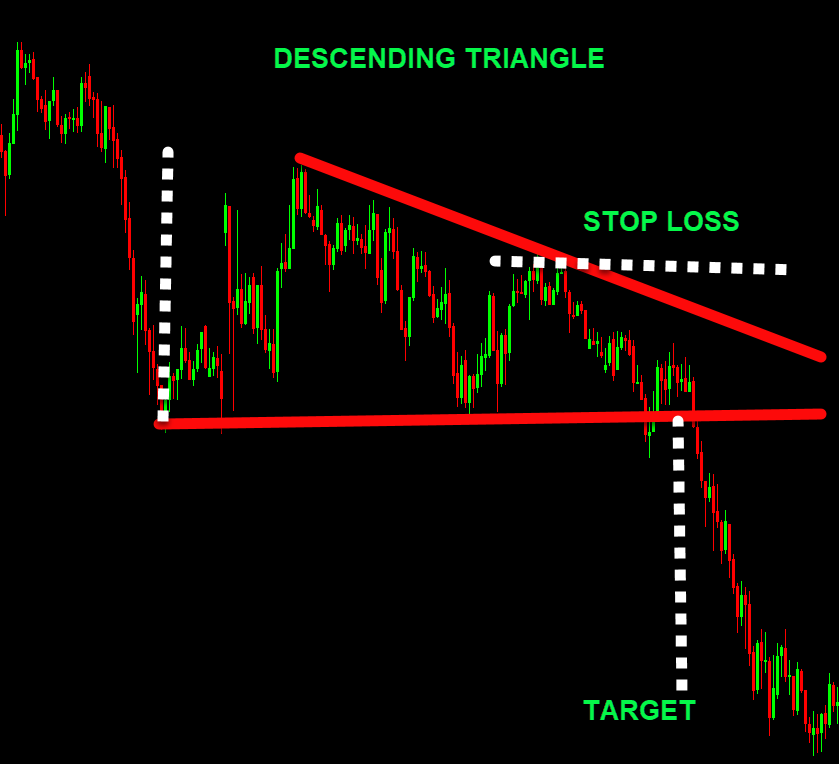
Target: Measure the width of the triangle at its base (widest part), then project that distance from the breakout point in the breakout direction.
It’s the exact opposite for the descending triangle pattern
1. Entry: When to Jump In
The “entry” is not just when you see a pattern — it’s when price gives you a signal that the pattern is more likely to work than fail.
✅ Why confirmation matters
-
Patterns often mislead. Price can fake a breakout — slip past a support/resistance or trend line, then snap back. Without confirmation, you risk being on the wrong side.
-
A valid breakout often needs a close beyond the boundary (resistance/support or trendline)
📌 Entry methods
Depending on your trading style (aggressive vs conservative), you can choose:
-
Aggressive entry: Enter near the breakout — e.g. right when price closes above resistance or below support/trendline. You catch more of the move, but risk more from false breakouts.
-
Conservative entry (retest entry): Wait for a pullback (retest) toward the broken level — for example, after breakout of a triangle or head-and-shoulders neckline — and enter when price touches that level and holds. Lower risk, but you may miss some moves. This is often preferred by conservative swing traders.
Rule of thumb: don’t enter simply because “it looks like a pattern.” Wait for a decisive breakout or retest — your objective confirmation.
2. Stop-Loss: Protect Before You Profit
A stop-loss (SL) is non-negotiable. Every chart-pattern trade needs one, because patterns can — and do — fail. Proper SL placement defines your risk and protects your capital.
📍 Where to place stop-loss
-
Place SL just beyond the invalidation level — the price point which, if hit, means the pattern is broken or no longer valid.
-
For example:
-
In triangle or wedge patterns: SL just outside the opposite side of the triangle or wedge from the breakout and recent high/low on the chart, before the breakout happened.
-
In a reversal pattern like Head and Shoulders: place SL slightly above (for a short trade) or below (for a long trade/inverse head and shoulders) the “shoulder” or structural extreme.
-
-
Avoid arbitrary or too-tight stops — these get triggered by the normal price “noise,” especially in Forex, which is volatile.
🧩 Risk Management & Position Sizing
Even with a “perfect” SL placement, never risk too much of your account on a single trade. Many pattern-trading guides recommend risking no more than 1–2% of your account balance per trade.
This way, even a string of losing trades doesn’t wipe you out — and you stay in the game long enough for the patterns to pay off over time.
3. Target: Where to Take Profit
Having a target (or multiple targets) is as important as entry/stop-loss. It helps you avoid the common mistake of “hoping price goes further” — which often ends in blows or greed-driven mistakes.
🎯 How to set targets: the “measured move” approach
A widely-used method to set profit targets is based on the structure of the pattern itself — specifically, the “height” of the pattern projected from the breakout point. This is often called the measured move.
-
Triangles/wedges: measure the widest part (vertical distance between support and resistance or trendlines), then project that distance from the breakout.

-
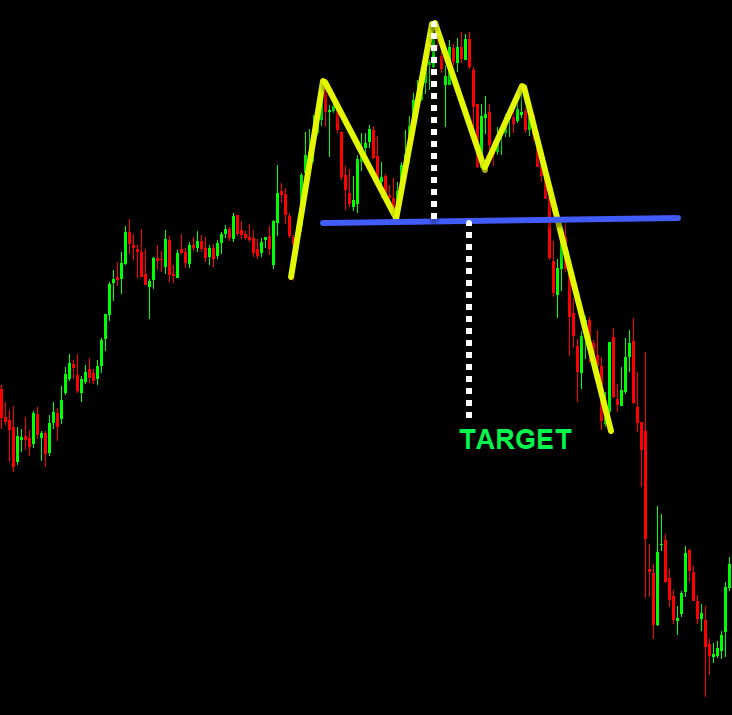
Reversal patterns, like Head and Shoulders, measure from the “head” to the neckline; then project that downward (for bearish) or upward (for bullish inverse) from the breakout.
✅ Why this works
Because patterns reflect underlying supply/demand balance — how far buyers or sellers were willing to push — the height gives a realistic estimate of how much price might move once that balance breaks. That’s better than guessing or aiming for round numbers.
📊 Multiple targets / trailing profit
You don’t have to necessarily exit the entire position at the first target. Many traders do this instead:
-
Take partial profit at the first target (e.g. 50-70%)
-
move stop-loss to breakeven
-
let the rest run — especially if momentum is strong, or breakout is supported by fundamentals or strong volume, and trail SL, let the market to decide when it is enough
This approach balances locking in gains with allowing profits to run — ideal for Forex swing trading.
🛡️ Putting It All Together: A Mini Checklist for Pattern Trading
Before you enter on any chart-pattern trade, run through this quick checklist:
-
Pattern is clearly defined (support/resistance, trendlines, swings).
-
You have confirmation — breakout or clean retest.
-
Stop-loss is placed beyond the invalidation point or structure boundary.
-
Your position size/risk per trade aligns with your risk tolerance (e.g. ≤ 2% of account).
-
Profit target(s) is calculated based on pattern measurement (measured move).
-
Reward-to-risk ratio is acceptable (e.g. 1:2 or better).
-
You prepared a plan for partial profit-taking and trailing stop if applicable.
If any of the above fail, skip the trade or wait for a better setup. Discipline > impulse.
📚 Example Scenarios — How This Works in Real Life
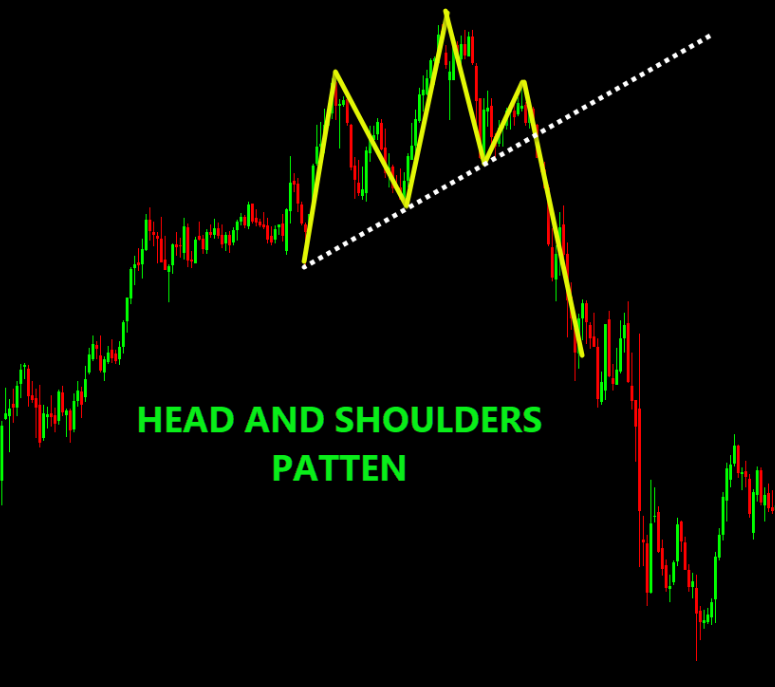
HEAD AND SHOULDERS
How to trade it (step-by-step)
-
Identify the pattern: Look for the three peaks (or three lows for inverse), and draw the neckline connecting the “troughs” (for normal H&S) or “peaks” (for inverse).
-
Confirmation: Wait for a clear break of the neckline (on your chosen timeframe) — a close beyond is better.
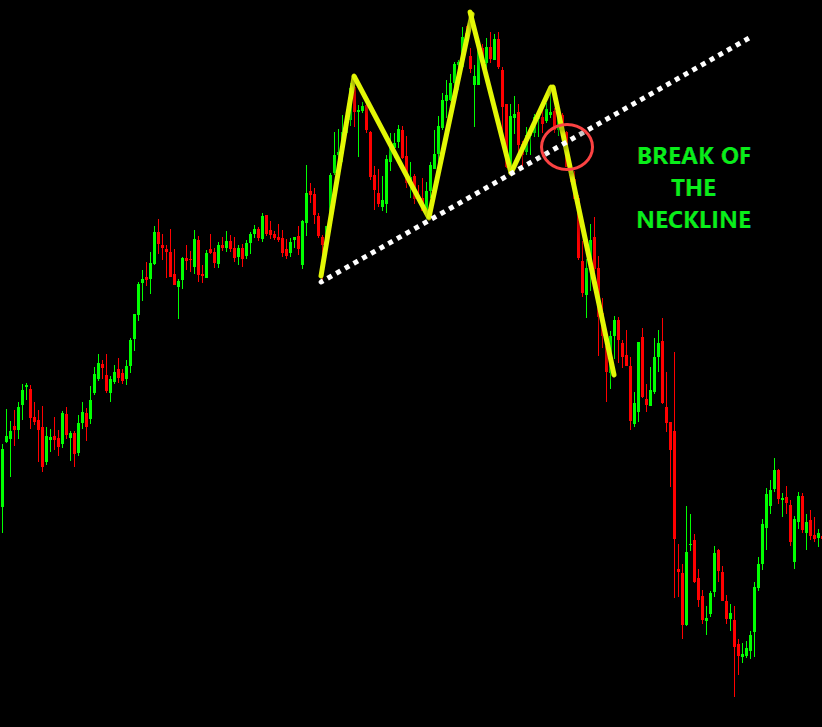
-
Entry: After the break, you can enter short. Some traders prefer a retest of the neckline (price breaks, comes back, touches the neckline then continues) for a safer entry.
-
Stop Loss: Place beyond the right shoulder. That way you limit risk and respect the structure.
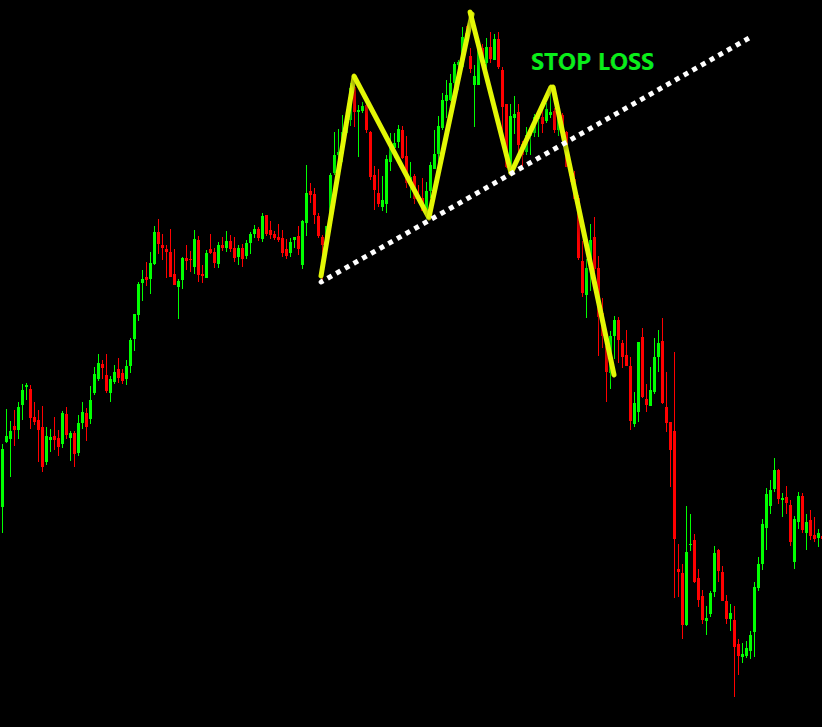
-
Target: Measure the vertical height from the head to the neckline; project that distance downward (for normal) or upward (for inverse) from the break point. That gives a target zone.

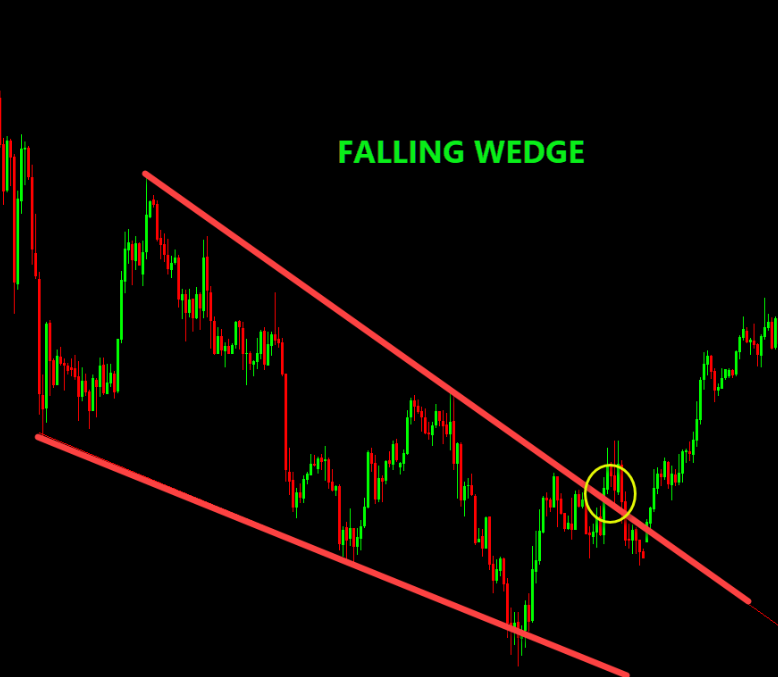
HOW TO TRADE RISING AND FALLING WEDGE PATTERNS
How to trade them
-
Sketch the two trendlines: ensure multiple touches (ideally 3+).
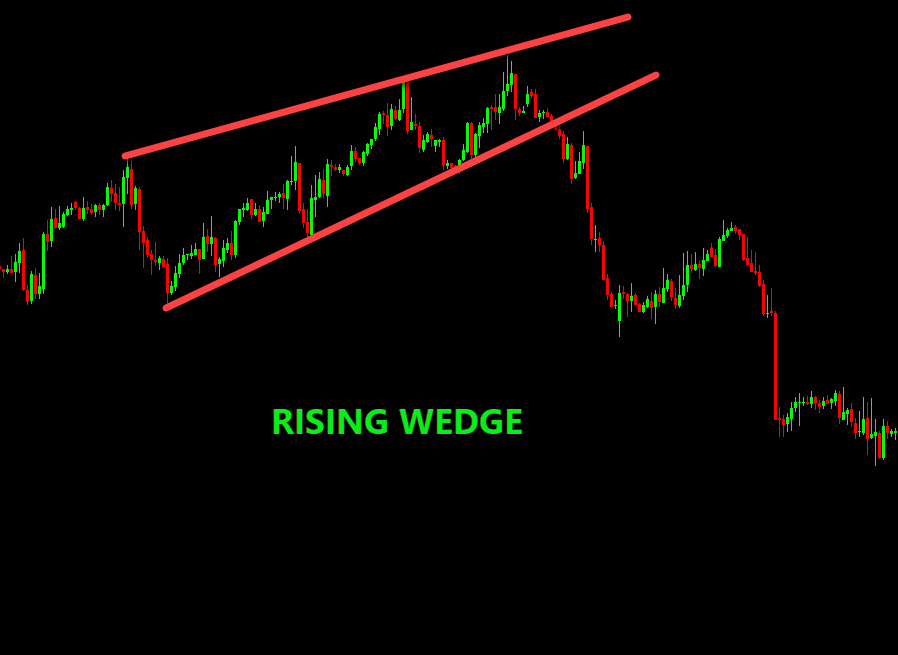
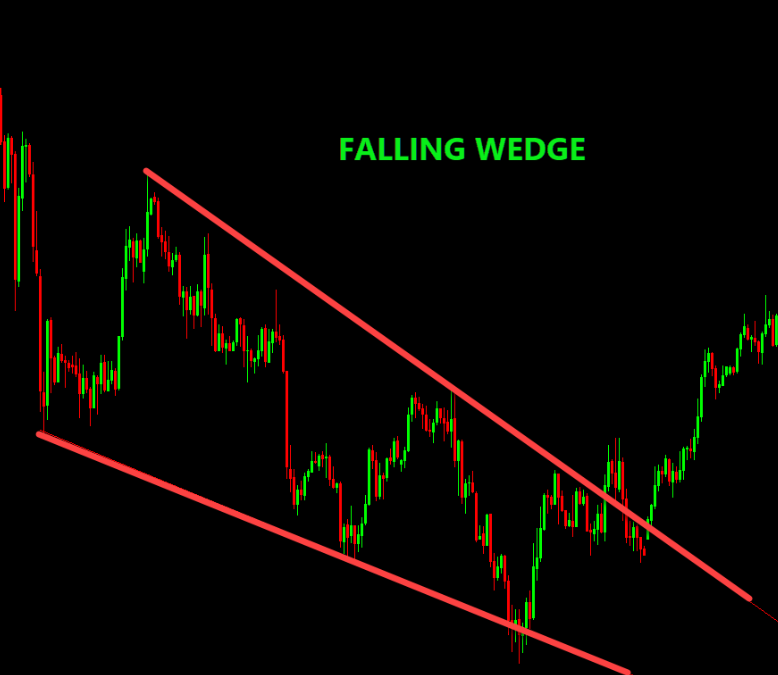
-
Recognize context: Is the wedge forming after a strong move? That increases the probability of a reversal.
-
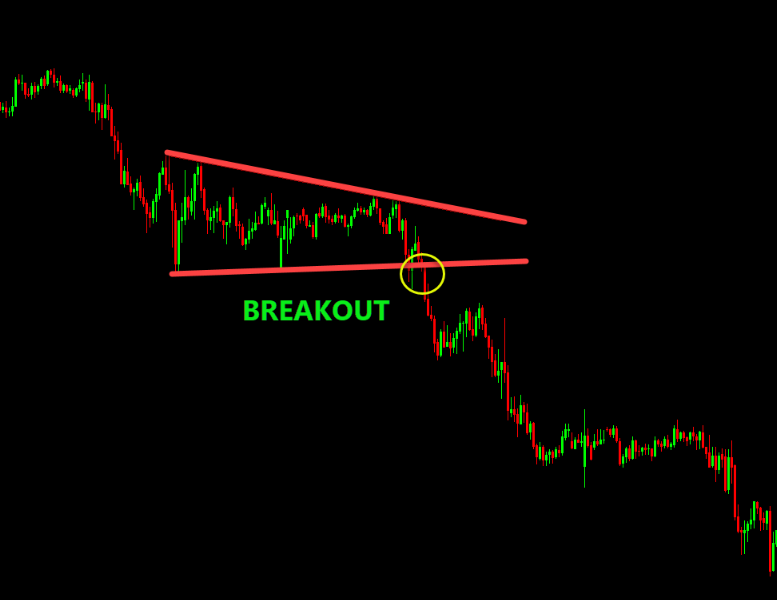
Entry: Wait for a breakout outside the wedge. For a rising wedge, look for a break downwards. For falling wedge, a break upwards. A retest of the broken line adds confidence.
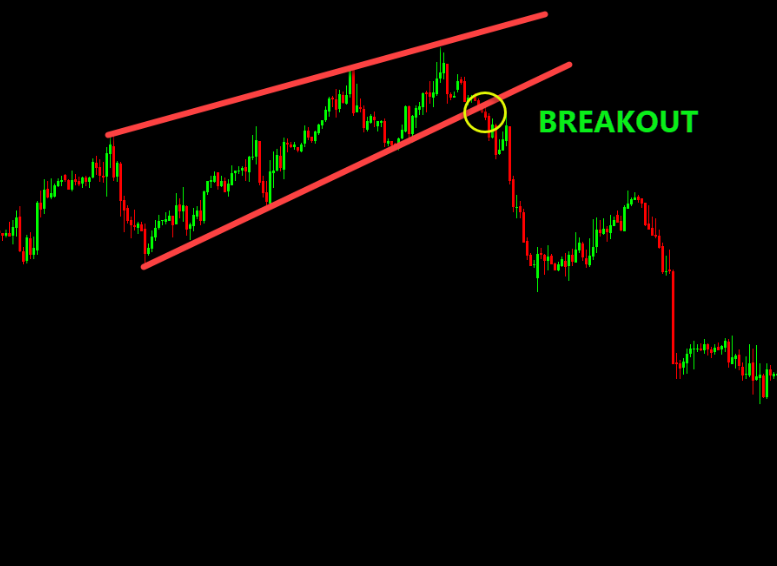
-
Stop Loss: Just outside the opposite side of the wedge (for rising wedge short: stop above the recent high).


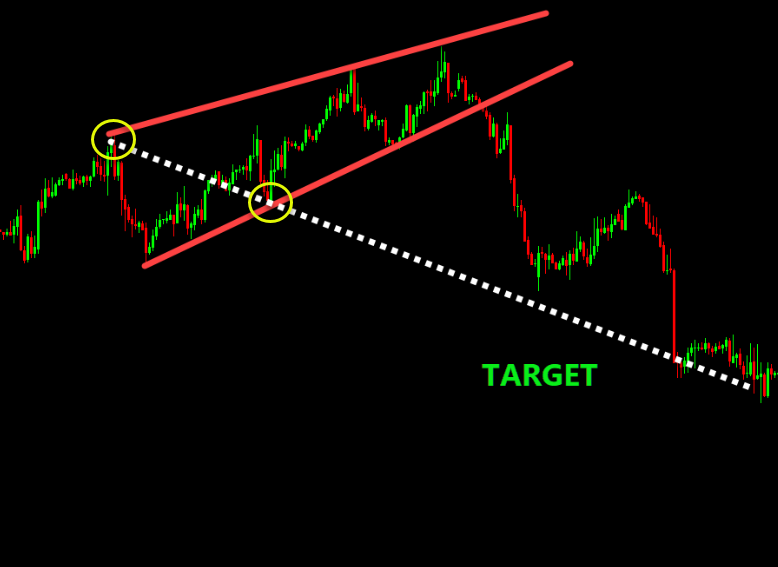
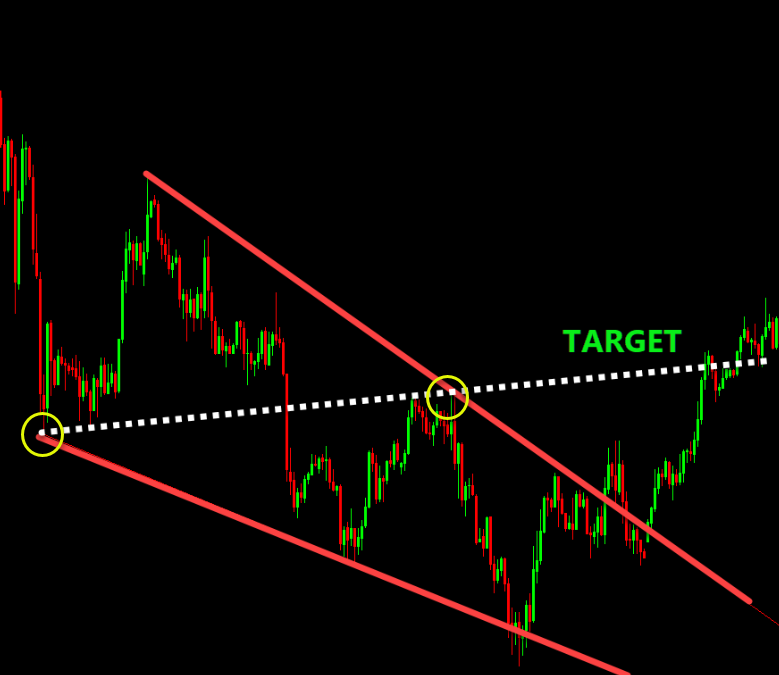
-
Target: Measure the height of the back-end of the wedge (i.e., the widest part) and project it from the breakout point (in the breakout direction).
⚠️ Common Pitfalls — What to Watch Out For
-
Entering too early (before real breakout/confirmation) → high chance of false breakout.
-
Stop-loss too tight → you get stopped out by market noise.
-
Ignoring risk/reward ratio — entering trades where potential loss > potential gain.
-
No volume or momentum confirmation — breakout on low volume often fails.
-
No plan for trade management — failing to scale out or trail stops, or ignoring when the setup becomes invalid.
🔑 Final Thoughts — Trade the Pattern, Risk the Plan
What turns chart-pattern recognition into a reliable trading tool is discipline and rules. Entry, stop-loss, target — these aren’t optional extras. They are the core of risk management.
By following the rules:
-
You avoid the biggest killer of trading: random emotion and revenge trades.
-
You make trading repeatable, not random.
-
You give yourself the chance to survive many cycles and let the law of probabilities work in your favor.
If you commit to pattern-based setups — only entering after confirmation, always protecting risk, and always planning your exit — you’re not “fishing” anymore. You’re executing a strategy.